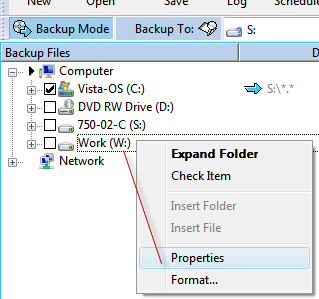
While viewing and selecting drives, folders, and files in the backup and restore trees, you can click the right mouse button to use additional features.
This is the same as selecting a folder or file by clicking its check box with the left mouse button. (To clear a folder or file's check box, select the folder or file name, click the right mouse button, then click uncheck item. Note that if you chose folders above the selection, then if you select a sub-folder or file, a ![]() 'do not copy symbol' or cancelled box appears, indicating that you cannot copy those folders or files.
'do not copy symbol' or cancelled box appears, indicating that you cannot copy those folders or files.
If you select a folder in the backup or restore tree, you can insert a new folder into the backup or restore tree before the selected folder. This provides a means for the current profile to recognize a folder that will be present in a future backup or restore. You must select the new folder; otherwise, when you close the profile or refresh the screen by pressing F5, the newly-inserted folder will not be present.
If you select a file in the backup or restore tree, you can insert a new file into the backup or restore tree before the selected file. This provides a means for the current profile to recognize a file that will be present in a future backup or restore. You must select the new file; otherwise, when you close the profile or refresh the screen by pressing F5, the newly-inserted file will not be present.
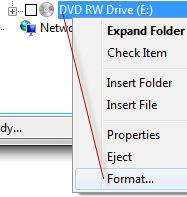
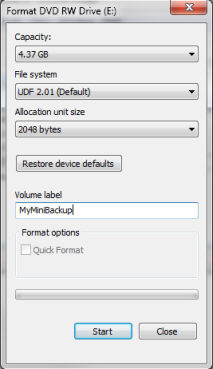
DVD, CD discs and USB disks may be formatted from within Double Image by right-mouse clicking on the drive. A 'Format' dialog is presented giving you the ability to provide a Volume label.
Removable drives may also be Ejected from within Double Image.
Flash drives may also be Formatted and Ejected.

You can add a network computer name to 'Network'. Use the computer name. Slash characters "\\" are not needed. This is called using UNC. Follow this step by Inserting a Network Share. If running Windows XP or Windows 2003 Server you can also insert a Network Drive, like D$ for drive D:\, for example.
The Network Computer inserted into 'Network' does not need to exist or be recognized by the system when you create the Network Computer Name, however a few seconds will elapse while Double Image looks for it on the network. The added computer name should be present when Double Image runs and uses the profile for copying files over the network.
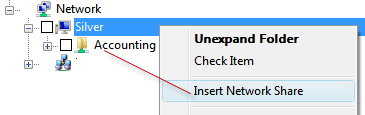
Similar to 'Insert Network Computer', a 'Network Share' may be inserted under a Network computer. The share does not need to exist at the time you are updating the profile. Usually this step is done when you expect the Share to exist when the backup is run. The above steps can be done when making preparations for deploying Double Image and backup profiles when the network machines are not yet accessible.
Inserting a Share or an Admin Share Drive
|
You can create shares via Double Image or Windows Explorer. You will need access rights to the object you intend to share, normally a user running with Administrator rights:
Right mouse click on a drive, folder or file.
Properties
Sharing
Advanced Sharing
select Share this folder
Permissions
Grant groups and-or users: Full, Change and-or Read permissions
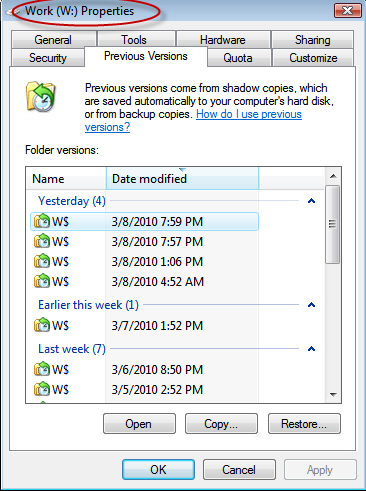
Some of the property values include size, date created, date modified, security, sharing and 'previous versions'. The properties values are provided by the installed Windows operating system.
Note: As of this writing some Windows editions including 'Vista Home Basic', 'Vista Home Premium' and 'Windows 7 Home Premium' may not provide the feature to recover files using 'previous versions' in the folder or file 'Properties' view.
|
|
|
||
|
|
'How do I use previous versions?' (as shown in the above images) can provide you with more details on this subject.